Computational Couture: Printing interlocking circles at different angles
After looking at my Computational Couture designs again, I decided to step back and look at a simplified way in which shapes would connect.
In tis moment I chose a circle and it was designing the 4 interlocking circles which led me to understand where this could be taken in the future when I could go back at working with Grasshopper and Parametric Design.
Here are my results of using Rhino and also 3D printed examples of my work
Rhino Interlocking circles
Here you can clearly se the structure of tilting the interlocking circles from horizontal and vertical, to a more diagonal axis.
It is this idea that I have see in many 3D printed chain tutorials and so to understand why that worked, I wanted to try this first.
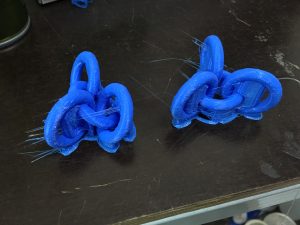
3D printed pieces and their differences
As you can see, the two pieces were printed side by side. What really struck me was their differences in how the printing turned out, just based on the changing of angling and titling the circles.
Some parts printed a lot smoother and although the concept of printing the pieces designed ina . diagonal position would be stronger, I think the best finish overall was from the horizontal and vertical connected circle piece.
The one on the right has all the circles near enough to a diagonal axis as I could get, whereas the one on the left I have kept the 3 outer circle standing upright and the centre connecting one is perfectly horizontal.
Below you can view the slideshow of the 2 pieces in various stages.
Recent Comments